

A faulty water pump can be diagnosed by a number of different symptoms.
- Water leaking from offside of the car
- Increasing noise in time with the engine revs
- Intermittent and inconsistent engine cooling
The part number for a replacement water pump is Q000 4681 V002 (Euro car parts number 201910010). This is the same for both the 600 and 700cc engines.
The water pump is located on the offside of the engine and is run from the alternator belt.
If your car has not got air conditioning, you will have a lot more room from the top of the engine to access the bolts.
If you do have air-con then without lowering the engine changing the pump is quite tricky, however it is not impossible and this guide will show you how to change a water pump without the need to lower or affect the engine.
First remove the rear panels, then jack up the car, place on axle stands and remove the offside rear wheel.


Use a 6mm Hex key to remove the coolant drain plug, ensure you catch the coolant in a suitable container and dispose of responsibly.
Remove the expansion tank cap to ensure that no coolant is held in the system.
Remove the wheel arch lining, 3x 10mm plastic nuts.

Remove the plastic crank pulley cover, this is held onto the subframe with 2 push-pin plastic fixings.

If you have air conditioning; using a T45 torx bit, slacken the air-con belt tensioner, and push the tensioner, this will release the tension and the belt can be removed.

Using a 15mm socket, slacken the alternator (and water pump) belt tensioner, push the alternator in towards the engine to slacken the belt. The belt can then be removed.

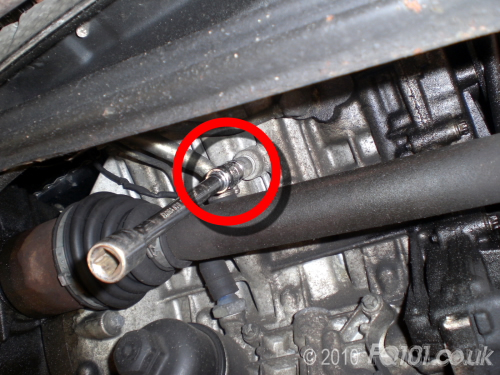
Unfortunately, the alternator pivots through the water pump housing itself, therefore using a 16mm socket, this must also be removed.
Be careful to retain the square nut which sits on the back of the alternator. It might be easier to let it drop from the back of the alternator rather than try to reach it with your hands!.

The water pump pulley covers a number of the pump retaining bolts, therefore this needs to be removed to be able to fully access the retaining bolts.
The pulley is held on with 4x 4mm Hex key bolts, we were able to use a fitting and then attach a spanner to get the leverage. They should simply undo by holding the pulley in one hand and moving the spanner in the other.
If you don't have a 4mm hex key to hand, the "ikea" furniture key's are also this size and would work too.


The water pump itself is held in place with 7 x E10 torx bolts. Although they are all accessible, there will be a degree of 'feeling' where they are, but there should be enough room for you to fit your ratchet and E-bit onto each bolt without interference.

With them removed, the water pump will be most likely 'stuck' to the block, we found we were able to release the pump by gently levering under the pulley mount. We also noticed that as the pump came away, more coolant was released from the drain plug at the back of the engine, so keep your container under the engine at all times.

The Pump together with it's seal came away from the block face, by rotating it by 180 degrees we were able to remove it completely through the gap between the alternator and the crank pulley.

Take your new pump and fit the seal in the groove on the mating face.


Locate the new pump in place, we found it easier to put all the bolts in by hand first so the pump (and seal) goes on square.

Tighten the bolts & refit the pulley.
Refit the top bolt for the alternator, you'll need to reach around the back of the alternator to hold the square nut in place until the thread of the main bolt catches.
Refit and retension both of the belts.
Refit the coolant drain plug.
Refit the cam cover, arch lining, wheel and panels.


Follow the guide to replace the coolant and bleed the engine.


